I just used up my herb infused olive oil this morning, and it’s time to make some more! I originally made this infusion for a friend of mine who suffers from excema. I did a bunch of research and found as many herbs as I could which were known to treat excema. The infusion lasted me a long time, as it was made with olive oil (long shelf life) and kept in the refrigerator between uses.
Today I am using organic extra virgin olive oil again, and added a whole bunch of herbs that are good for skin care. In today’s infusion are:
organic calendula – antibacterial and immunostimulant, helps heal broken skin
organic yarrow – helps heal rashes and broken skin
organic rose hips – helps regenerate skin, hydrates, contains vitamin C
organic nettle leaf – anti inflammatory, soothes burns, treats acne
organic plantain leaf – antibacterial and anti-inflammatory, helps with itchy skin
chickweed – helps heal broken skin, helps with itchy skin
So, after about six weeks in a sunny window, this oil will be ready to be strained and used in lotions and balms. The lotion will be available here in July.. I can’t wait!! 🙂
For this month’s Great Cakes Soapworks Challenge Club, Amy Chose mini dessert soaps! (Just for reference, that is a dinner plate the soaps were photographed on.) The challenge included an excellent tutorial by guest teacher Cee Gorden. Since I got second place last month for my Forest Bark soap, my admission to the club this month was FREE! (Gotta love free!)
So, I talked to my husband and kiddos about what their favorite desserts were, just to get some ideas. They really like dessert! So, then I had to combine all the ideas with my mental images and then crunch the ideas into something I could actually achieve using soap. I loved the idea of making a tiny wedding cake, so I knew that would be one. Then I knew I needed a tart of some kind. The contest requires four mini desserts, so I was halfway there, and I figured the other ideas would come as I started on the first two.
Wedding Cake Soap
This soap uses little CP soaps that I made in measuring cups. The soap is a creamy white and smells tropical/fruity (Butt Naked from Nature’s Garden). Then I used Cee Gordon’s recipe for making fondant from melt and pour soap and started working on the fondant stripes to go around the cakes. This was very tricky!! If you watch my video, you will see me rolling that stuff out over and over again. Every time it stuck to something-either the mat, or the rolling pin, or my fondant mat. I kept adding more and more corn starch, and finally, it started behaving. Getting the pretty little pattern from my fondant mat onto the cake was definitely the hardest part of this challenge for me. The brown fondant is colored with cocoa powder, and the CP soap has coconut oil in it. (We needed to use at lease one food item in this challenge). Finally, I sculpted a little flower and leaves out of the fondant, and then added sugar pearls to decorate the middle layer. The little “cake mat” underneath is a coaster that I found at the dollar store. 🙂
Blueberry Tart
I finally settled on using blueberries for this tart, because I thought I would be able to do a good job on the color and shape of these. It took FOREVER to make these berries! The tart is tiny, and it doesn’t look like it would hold that many blueberries, but I felt like I was rolling out those little balls for a really long time. (Maybe it was the fact that my family was clamoring for dinner at the time?? “Mommy’s almost done, honey. Just a few more minutes . . .”). Then I started working on the crust. I added turmeric, cocoa powder, and mica to get the tannish color. Then I used my finger to rub some mica over the edges to give it the look of being cooked. Finally, I added some blue mica to clear M&P soap to get the saucy look that the blueberries needed. It looks so real!! I have had to explain that it is soap and therefore not edible to my 4 year old three times now.
White Chocolate Truffles
Every year, when my mom and I go Christmas shopping, we always seem to stop by a chocolate store and get truffles. I have always loved white chocolate, and that’s where the inspiration for these truffles came from. I used mini ice cube trays as my mold for these, and these are from the same CP soap batch as the wedding cakes. These were so much simpler than the first two desserts! I just melted some MP soap and added cocoa powder and brown sparkly mica and drizzled it over the top. Ta Dah!!
Creme Brulee Soap
Last, but not least is this decadent delight! It just so happened that one of the little CP soap cakes that I made in a measuring cup fit perfectly into a ramekin that I had in my kitchen. Immediately, I knew this was going to be creme brulee. I took one of the mini ice mold CP soap pieces and dipped it into red decorating sugar, then I made ONE MORE blueberry (I know!!!) and then took a leaf from my favorite tree in the back yard. Then I mixed some cocoa powder and mica with some organic sugar and sprinkled it on top of the cake and spritzed with water to make it look carmelized.
So, that is my dessert soap making journey! It was fun, but I rebelled the whole time because it was soap for art’s sake and not for actual body washing. My thrifty spirit was fighting me every step of the way! Eventually, I satisifed both my practical side and my artistic side by telling myself this: The wedding cake can be taken apart, and each layer used as soap. The creme brulee can be taken out of the ramekin and used. The truffles actually make fantastic travel soaps (no more public restroom soap for me, thank you!). And the blueberry tart? Well, that one is just for looks. Three outta four ain’t bad. 🙂
Whew! I have been busy making soap again! Once I heard about the spinning soap swirl, I had to give it a try. It is such a cool way to swirl soap, and so uncomplicated. And it just happens to be this month’s Great Cakes Soapwork Challenge. I made three batches for this challenge~because there are so many variables to explore with this technique.
For my first batch, I used an essential oil blend, and several shades of pink/mauve. I colored it with Brazilian red clay, and I also added bentonite clay because clays are such good detoxifyers, and I just like the silky feel of soap with clay in it. I blended my mixture to thin trace, mixed the colors, and started pouring away. Here is the video showing the making of this soap:
and, a couple of pictures of the finished soap:
I liked this one, and the smell is fantastic, but I was really hoping for skinnier stripes. So then, I decided to go for batch number 2 🙂
My son had been asking me to make a soap for him. He wanted some “manly” essential oils like fir, pine, cypress, and cedar. As I was looking at various online examples of spinning swirl soap, it occurred to that the unique way the colors swirl together resembles the bark pattern on trees. Well, then I looked at a bunch of photos of tree bark, (I bet you can see where this is going) and then I decided to create Forest Bark soap. I chose a color palette using the shades that kept popping up in the bark photos, and then I made sure to barely mix the soap at all (just to emulsification), so my batter would be very thin and my stripes would end up super skinny. I really can’t believe how much like tree bark it turned out!! (Maybe I should have done this for the landscape challenge last month, LOL).
So, without further ado, here is the video showing how I made Forest Bark Soap:
And then, because I happened to fall in love with the spinning swirl, I had to make just one more batch. This one is scented with lavender and lemongrass essential oils. I am loving the way lemongrass smells lately! I wanted to do some bright colors with the skinny swirls, just to see how it would look. I also decided to pour in six spots, instead of just four. Here are a few photos of how it turned out:
and here is the video:
It was really hard to decide which soap to enter into the contest. I am pretty happy with all of them. I finally decided that the uniqueness of the Forest Bark makes it my overall favorite. I would say this is one of my all time favorite ways to swirl soap. The possibilities are endless!
I ordered a sample size of Fruity Rings scent from Nature’s Garden, and I could not believe how much it smells like that famous cereal! I don’t eat it (WAY too much sugar and processing for me), but I have fond memories of it. So, I decided I should make a soap that would let people indulge in that lovely scent without adding anything nasty to their bodies! I had seen a beautiful soap on one of my favorite soap blogs, Mignonnes, venez-voir si. She has lovely soaps, and she speaks French (like me), so I instantly liked her! Her soap has beautiful circles from all sides. I decided this was the way to go for my loopy soap!
First, I Googled “fruit loops’ to find a good pic and study the colors; then I chose 6 micas:
Preparing to mix my micas with olive oil.I just think these colors look so pretty on the mixing spoons. (I know I’m a nerd. 🙂Micas, mixed and ready for making circles.
Then, I mixed up my soap batter. I used my signature recipe, because I knew it would give me plenty of time to mess with it and still stay very thin. Next, I started pouring. I put white batter in the bottom, and then started making small circles with each of my mica/oil mixtures, then poured white batter right into the center of the circles.
The first little mica/oil circle.After pouring a few more colors, alternating with the soap batter.
Finally, once all the colors were in the mold, I made little lines with the remaining mica/oil mixtures so I could do some swirling on the top.
Little stripes on the top.After a bit of swirling.And, a bit more swirling, because, honestly, that is the FUN part! And it didn’t look “loopy” enough before.
Then came the awful part. WAITING. I know soap making is a hobby fraught with waiting, so maybe I should have chosen something that requires a bit less patience. But, I can’t seem to help myself. Finally, after nearly 24 hours, I unmolded the soap . . .
It came out very nicely!
I cut this soap sideways, to make the most out of the circle effect. Here it is, right after cutting, and before any primping. (Before it’s ready to sell, I will take the edges off, and clean the soaps up a bit.)
Cut and ready for the curing shelf!Pretty and loopy
I love it! I keep opening up the cupboard where it’s curing just to take another whiff! Now for some more waiting . . . It’ll be ready to use in about a month.
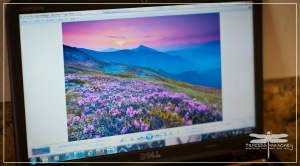
This month, for Amy Warden’s Soap Challenge Club, I made landscape soap! This is the first time I’ve tried to recreate a particular image with soap. So, I searched the internet for a beautiful photo of Colorado. This is what I found:
Click the photo to see the website where I found it.
I love this photo! I love the blues and the pinks and how it reminds me of my home.
The next step was to cut the photo into 12 slices in Photoshop, and pixel stretch each slice to give me an idea what each layer should look like. Here’s what one slice looked like:
So then, looking at all the slices, I chose a color palette and estimated how much of each color I would need. Then I selected a bunch of micas to mix for the colors.
choosing the color palettemicas mixed with olive oil
Next, I mixed my up my soap batter, using my signature recipe. It’s slow tracing, so I knew it wouldn’t let me down for this technique! I used a fragrance called “sunny herb garden” from Brambleberry. I thought it would be perfect for conjuring up the feelings of being on a mountainside in sunny Colorado. Next, I divided and mixed my colors. I only had four squeeze bottles, so I put the rest in pourable measuring cups. If I ever attempt this again, I will make sure to have a squeeze bottle for each color! It was really hard to get my lines straight and tidy trying to use a spoon and the measuring cup.
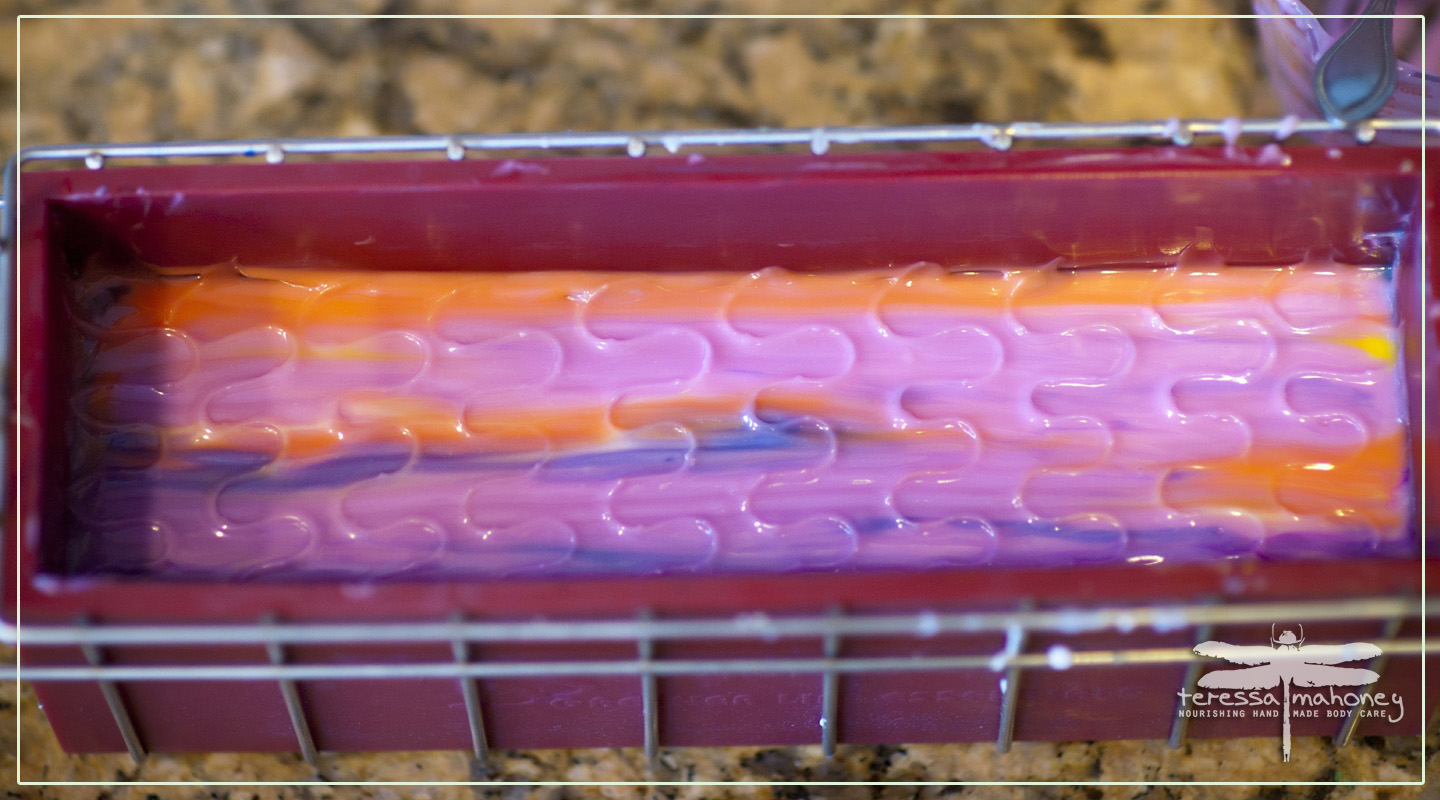
Finally, they were all poured and squeezed into the mold in layers, and I had a little fun on the top, using a tool I made of craft wire. I learned about this technique from Auntie Clara. You can read about it here. And last, but not least, I sprinkled the top with glitter. I got this really cool set of glitters from TKB trading. They come as a set, and each one has a shaker top. Sprinkling glitter on the top of soap may be one of my favorite things in the world.
halfway through pouringmy stamping toolthe stamped top
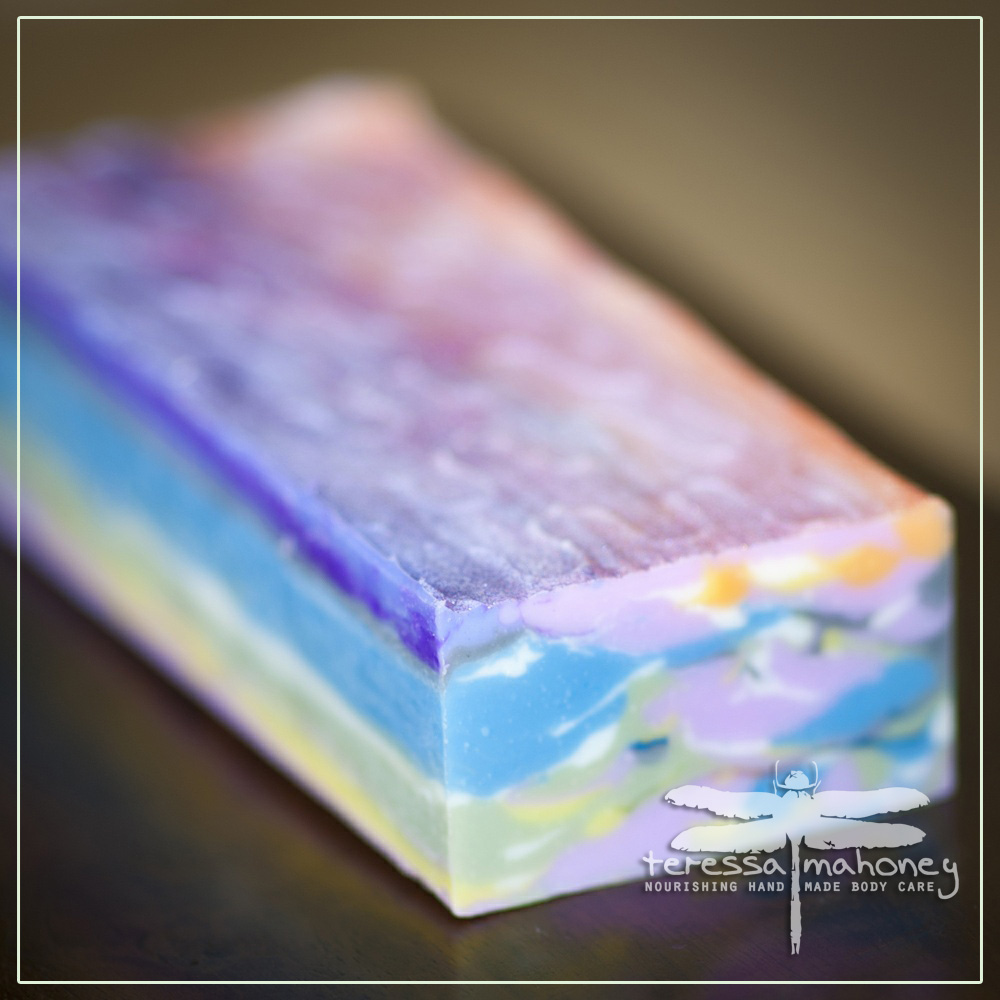
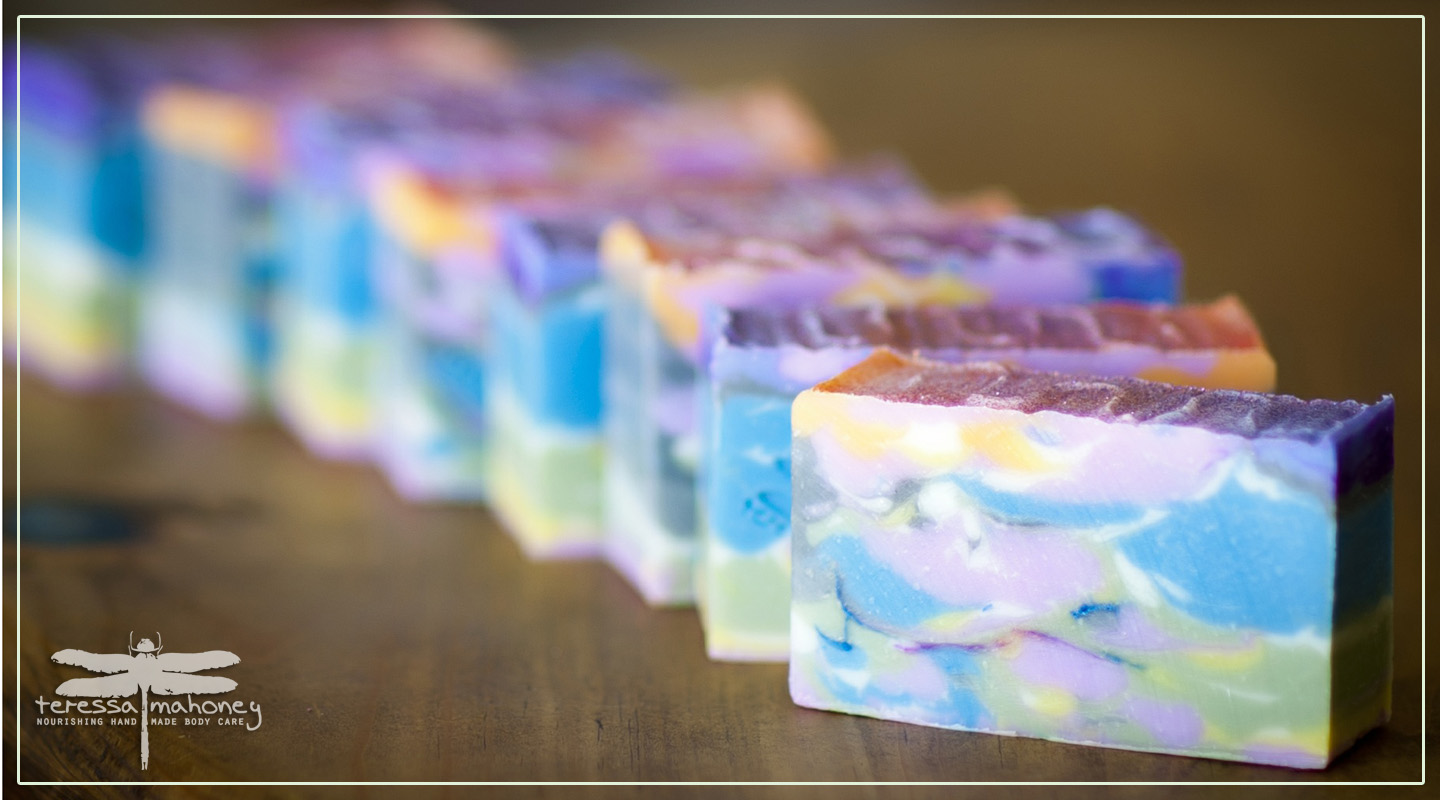
Then came the worst part: WAITING. And waiting, and waiting. I have been having a problem with the corners of my soap sticking to my mold if I don’t wait the full 24 hours to unmold it. But who can wait 24 hours to find out if your masterpiece is really a masterpiece or just a bunch of messy colors plopped in together??? Well, I survived the torturous wait, and . . . .
We have landscape soap! It is not as much like my inspiration photo as I had hoped. (In my mind, the slicing technique was going to recreate that beautiful photo perfectly.) But, I can definitely see the mountains, the flowers, the hillside, and the sunset. So, I think it worked! This is the most thought and preparation I have ever put into a soap, and I have Amy to thank for it!
I recently made a new friend! Its Johnelle Howes from Johnelles. It is so nice to have a friend to share in soap making trials and triumphs! We decided to make soap together this week.
We decided on rainbow soap. I used my signature recipe, which is notorious for its slow trace (usually a good thing!), and I barely emulsified it. I wanted to have plenty of time in case there was any problem with my new colorants from TKB Trading. These are their neon CP soap colorants, which come pre-dispersed in glycerine. These colors are super bright, and very pretty in the bottle! We separated our batter out into 6 cups, and colored each one. It took a lot of mixing with my mini mixer to get those colors incorporated, and their were still some tiny specks that didn’t mix completely, but the colors did turn out very nice. My plan was to lightly swirl each color with white batter before pouring into the mold in layers. I used cedarwood essential oil to scent this batch, and a tiny smidge of patchouli to round it out.
Too late, I realized that this batter was not thick enough! Neither the color or the scent did anything to accelerate the trace. By the time I realised this, I had already poured some white into each colored cup for my ITP swirls, and I didn’t want to blend any more, because it would ruin the swirling effect. So we just decided to go out on the deck and have a glass of iced tea while we waited for things to firm up a bit. It gave us a chance to chat about raising children, and a few other things we have in common!
Well, after two glasses of tea, we checked, and the batter was still super thin. We waited a bit longer, and then decided to just go for it! Johnelle held the spatula to help the layers not break through and I poured. So, because it was still so thin, we didn’t get the clean layers we were originally hoping for, but the soap still turned out very pretty!! I’m glad I kept the white swirls, because it lightens up the feel of the bars so nicely.
After pouring, we decided to make a little glitter rainbow on top. I had just received my tower of rainbow colored glitter from TKB, and was anxious to try it out. I finished it off with a little swirl, and Voila! Cedarwood Rainbow Handmade Soap!
Thanks, Johnelle, my new soaping friend!
Johnelle making soap with me!The finished soap, before getting cut into bars.
This is so exciting for me! I just opened my first store! Well, it’s a mini store inside of another store. . . but it’s just perfect. People keep asking me if I have my lotions and soaps somewhere so they can test and sample them. (I keep having to cart around a box of my products and meet people at random places so they can purchase.) I think we just solved that problem!! So, if you’re in the Denver area, please stop by and check it out at