Cosmic Wave Soap Challenge: Wavy Brights

Hello! Whew, I am squeaking by this month. I’m writing this literally 30 minutes before the link up for entries closes. And my photos are uploading to the computer as I write. Talk about cutting it close! Yikes.

Well, it’s not for lack of effort! I’ve made four batches of soap with this technique and I have to say, I’m mesmerized by it. When I first watched the tutorial, I had marble on the brain, because my parents are redoing their kitchen counter tops and we’ve been watching video after video on how to create that look with paint. So, I wanted the marble look for my entry this month, but I decided to practice with “pure” soap, because I was out.
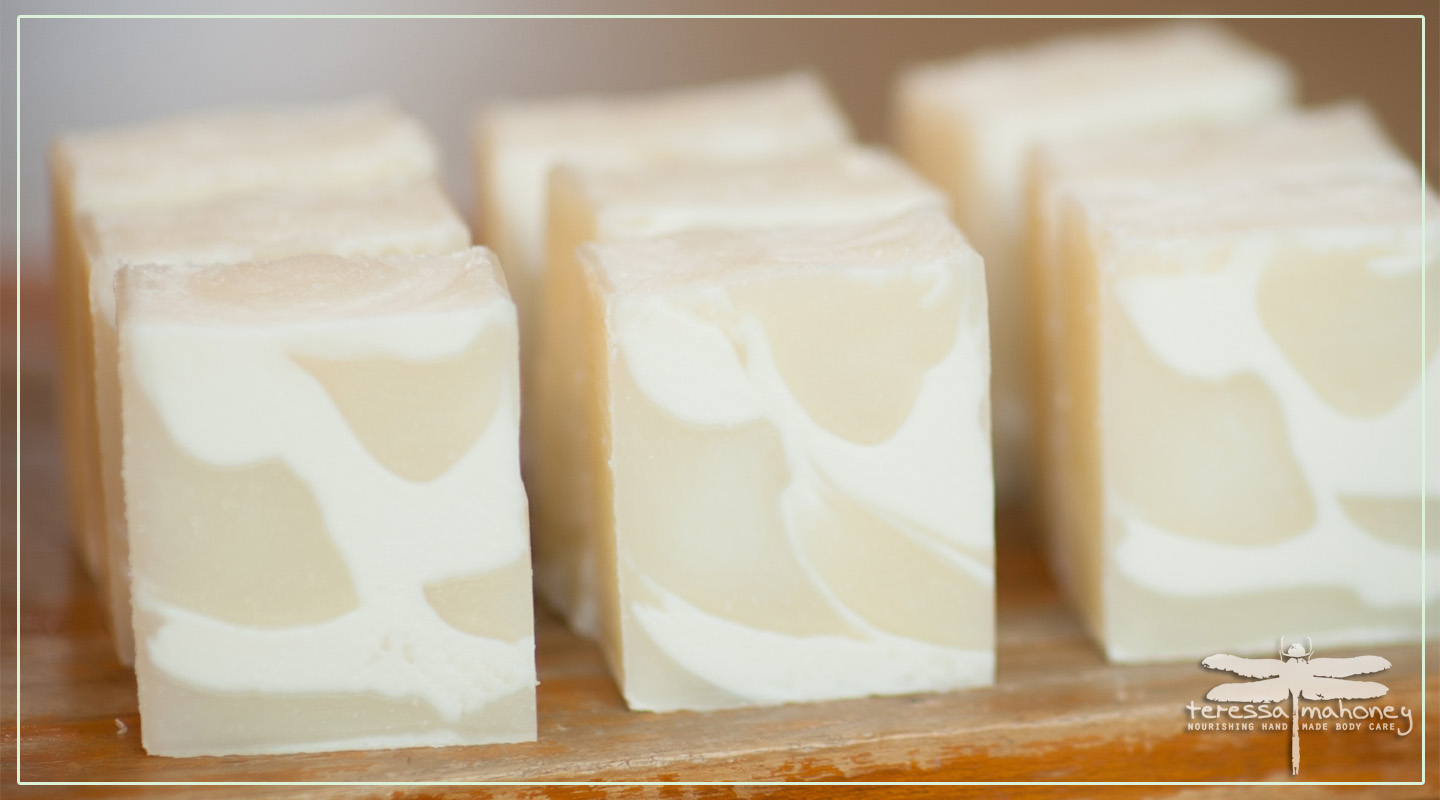
  • Pure Soap

I decided to try Auntie Clara’s ghost swirl technique for colors, because my Pure soap contains no added colors or scents. Well, as it turned out, this didn’t work for me at all. I was in a hurry and I didn’t vary the water/lye ratio as much as I should have to get a real swirl. There is a tiny bit of variation in color, but not enough for anyone but me to notice. So, as far as a cosmic wave, this one counts as a bit fat fail.

  • Wavy Brights Take One

Next, I decided to try my hand at bright colors. I haven’t made any rainbow soap for a while, so it seemed like just the thing. I did six colors, green, purple, blue, red, orange, and yellow. I used my slab mold. The main problem with these is the colorants. I used colors which really need stick blending to mix properly, but since I had to divide 15% of my batter between six colors, I didn’t have enough of each color for my stick blender to be able to reach. It was awkward trying to do it, and the end result is some dots of color which remained unmixed. It is scented with Fruity Rings FO from Nature’s Garden. I love that smell. It’s perfect for kids and grownups, and didn’t accelerate my trace at all.

I did, however, learn a lot about how to make this technique work. At the beginning, when the mold was empty, it was really hard to get my pouring pitcher close enough to the surface to make a good cosmic wave. I switched from my glass measuring cup pourer to my long tipped plastic pourer, and it made a huge difference. Fortunately, about the first 2/3 of the pour doesn’t really matter that much. That is very good news, because it took that long for me to start to get the hang of it. By my 4th batch, I didn’t really worry about wave placement until closer to the end of the pour. Some tips: don’t put much batter in your pitcher at a time, pour very close to the surface of your soap, and pour slowly. Here are some photos of my first bright batch:

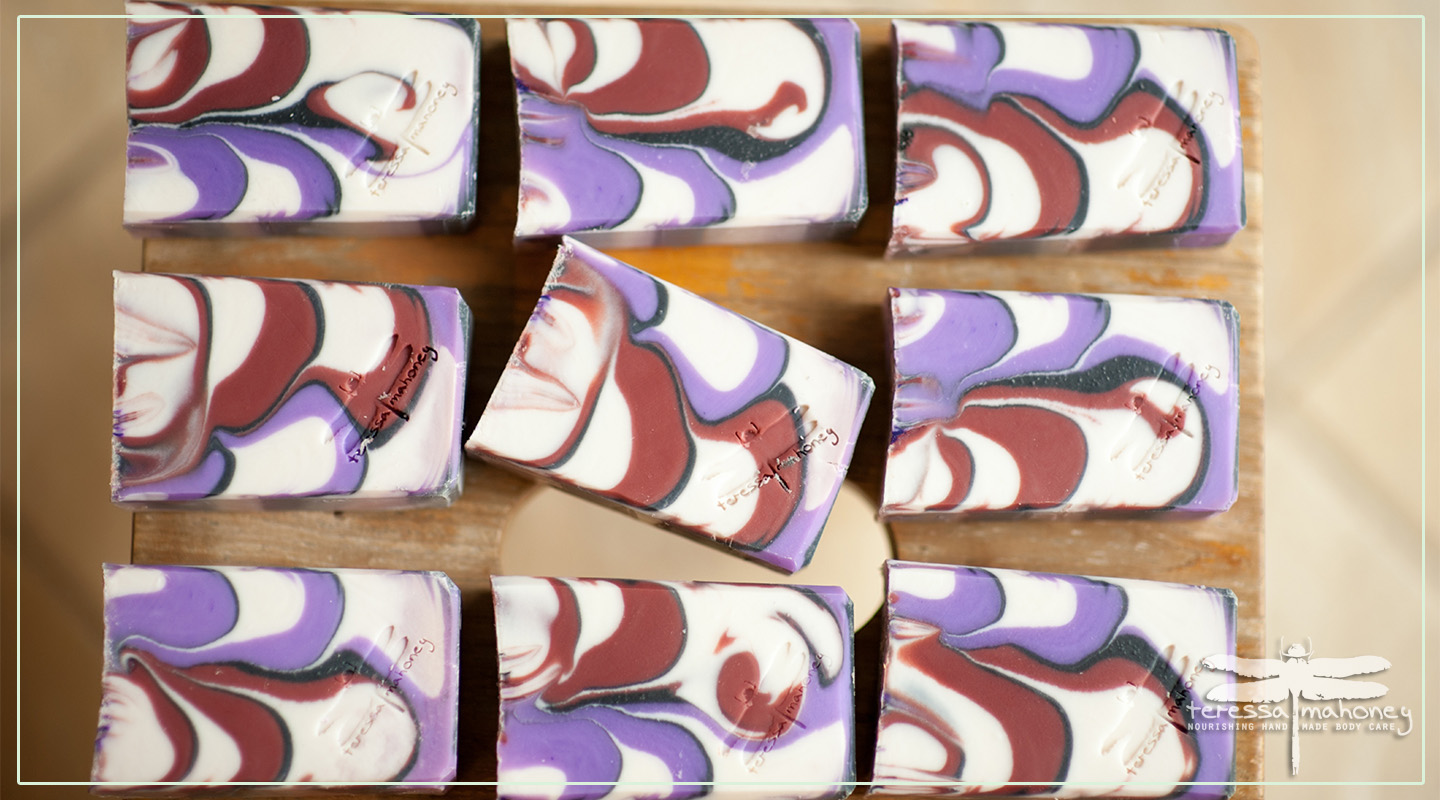
  • Wavy Brights Take Two

After this batch, I just had to try again. I love the mixture of colors, and the practice batch had put my fears of the colors turning all muddy to rest. This time I made a double batch of soap and made sure to have plenty of each color so that I could blend the colorants in well. I think it was a great improvement, as the colors are more vibrant and evenly mixed. Here’s how that one turned out:

And here’s the “making of” video:
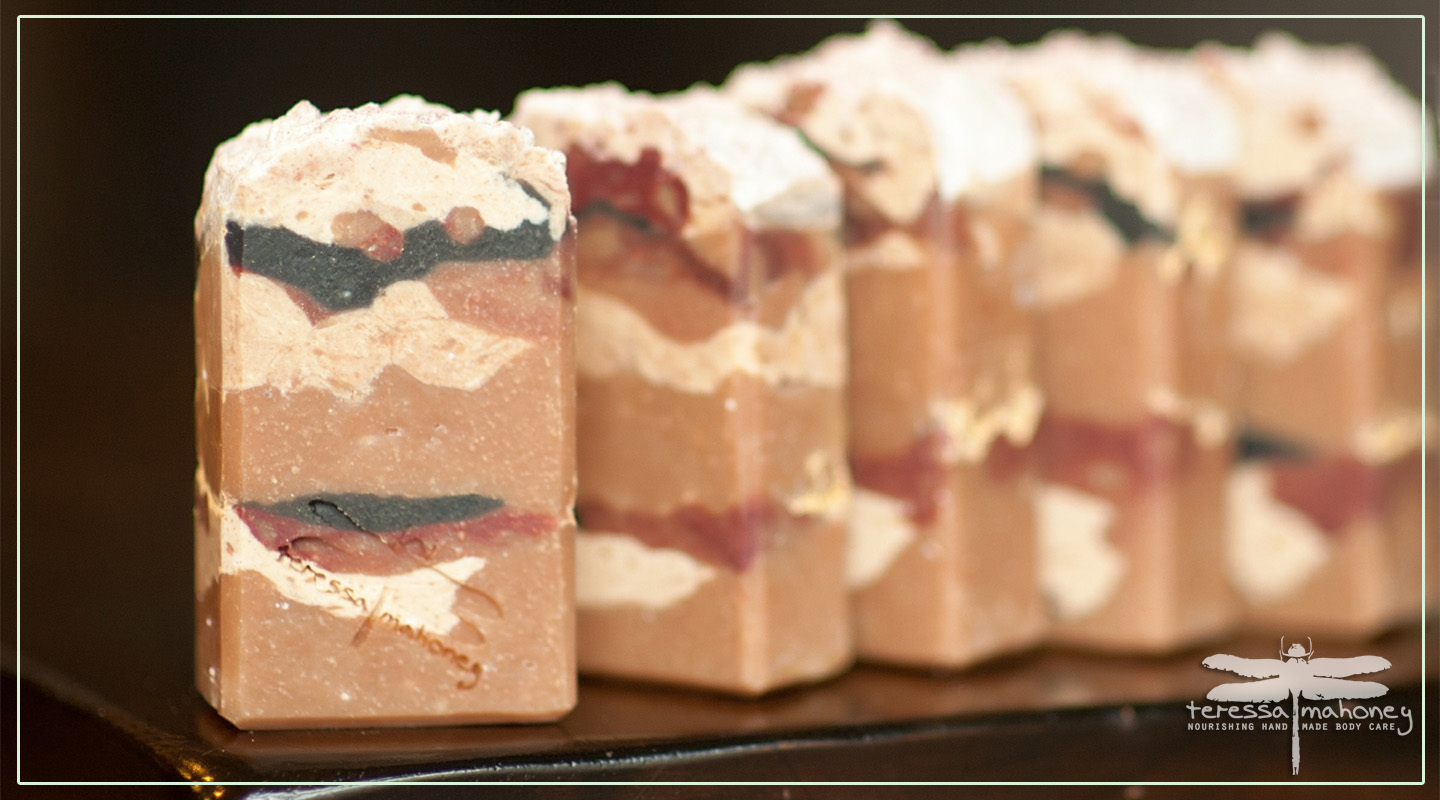
  • Marble Waves

So, now that I had tried out the technique a few times, it was time for the marble soap. I have developed a recipe for women’s shaving soap that has turned out to be very popular in my neck of the woods, and I happened to be out of it, so I decided to try for marble shaving soap. The recipe has organic sugar for extra bubbles, clay for extra slip as the razor glides against your skin, and powdered oats for a little extra skin TLC. I used shimmery black mica, shimmery white mica, and an accent of gold mica. It is scented with lavender and peppermint essential oils.

For the gold accent, I dribbled a mixture of mica and olive oil onto the top of my pouring pitcher. I have used this technique in the past to create interesting mica lines. The cool thing about it is that it also creates textural interest in the soap, as the olive oil simply melts into the soap as it cures, leaving behind a crater of sorts and the lovely mica color. Here’s how that one looks:

And here is the “making of” video:

I love it! It really reminds me of marble. I was torn about which soap to enter for the contest. But, since I had about one minute to make my decision after the photos uploaded, I didn’t think about it too hard. I went with Wavy Brights Two.

All in all, I’d say this technique is a keeper! Thanks so much Amy and Tatsiana for hosting the challenge.

Dancing Funnel Technique

_TSM7695Whew! It’s been forever since I posted a blog entry! It’s about time. This month’s Great Cakes Soapworks Challenge Club technique was the Dancing Funnel by guest teacher Tatsiana Serko. I LOVE her soap! This lady rocks. She and Amy co-taught the tutorial and it was very informative. There are two category options this month, all natural and synthetic. I opted for the all-natural. I made two soap batches:

Indigo Dancing Funnel Soap

I was brainstorming ways to make my soap different and eye-catching while still staying in the guidelines, and thought maybe I could do an ombré effect on the inside colors. I was picturing water and how the light hits it, causing slight variations in the blue. I thought I could add some additional texture to the blue by adding finely ground oats. Luckily for me, indigo powder creates a lovely blue and is all natural! It can also bleed a bit, which would be great for a gradient look. Unluckily for me, in the contest, there are no variations in color allowed for the inside color. Well, I went ahead and made this batch before I understood that rule, so, while it is not permissible as a contest entry, it was a great practice batch. Here’s how it turned out:

And here is the “making of” video:

Juniper & Cedar Wood Dancing Swirl Soap

I liked the look of that soap, especially the variations in the inside color, but I really needed to make a soap that followed the rules. So, I got out all my natural colorants to see if any ideas came to mind. I finally settled on these colorants:

  1. Activated charcoal mixed with a smidge of red clay and some ground acai berry for the background color
  2. Rhassoul clay for a creamy color
  3. Sea clay for a greenish color
  4. Purple Brazilian clay for (you guessed it) purple
  5. Red Brazilian clay for (surprise) red

I also wanted to add some cranberry seeds to the soap for two reasons. 1) I keep getting requests for exfoliating soap, and 2) cranberry seeds turn black and look really cool in soap.

This one was a lot of fun to make. I was already comfortable with the technique, thanks to my practice batch, and the only thing that was new was deciding where to put the colors. I finally decided on a random approach. I made around 20 dark dots, then filled in 5 each for the four other colors. Sometimes I had fewer than 20 dots, and I had to rotate in the colors to even things out.

You’ll notice in the video that a lot of the cranberry seeds floated to the top of my soap. I guess the soap was too liquid to hold them in place. Some of them stayed put, though, resulting in some interesting black dots in the soap. There was also some oil left on the top of the soap after 24 hours, so I planed off the top layer. Here’s the video:

And a few pics:


This technique is so cool! I love the way it turns out and it is not very difficult compared to some of the Soap Challenge Club techniques I’ve tried. I especially like how the sides of the bars look. I will be using this one again and again. My husband says it reminds him of cucumbers. (Of course, now I’m planning a cucumber batch, with a gradient of light to medium green for the inside color. I’m still working out how to get the look of the seeds . . . ) Thanks Amy and Tatsiana!

Complete ingredient list for Juniper and Cedar soap:

lard, water, olive oil, coconut oil, lye, activated charcoal, red Brazilian clay, purple Brazilian clay, sea clay, rhassoul clay, acai berry powder, cranberry seeds, essential oil blend (juniper berry essential oil, cedar wood essential oil, patchouli essential oil)

Tall and Skinny Shimmy Challenge (featuring major fails)

Whew. This month has been a bit of a whirlwind. I have made 12 batches of soap this week. Yikes. That is some kind of a record. This all happened because I just about sold out of everything I had on hand last week. Since I needed to make a TON of soap, I had a lot of opportunities to practice the tall and skinny shimmy, which is the technique for this month’s Great Cakes Soapworks Soap Challenge Club.

First Batch: Scented with Tobacco and Bay Leaf; colored with activated charcoal, mica, and titanium dioxide

I watched the tutorial and dreamed of stunning rain drop shaped loveliness adorning my newest creation. I pictured a beautiful thin line of black to separate the white from the other colors. It would be fantastic–the technique looked pretty easy.

Somehow, I just never quite executed the look I was going for. First, I had to make a tall and skinny mold. Tatiana Serko presented a wonderful tutorial which left me wondering why I had never fashioned my own molds before. It looked so very easy in her capable hands.

Unfortunately, my hands are a bit clumsier. 🙂 I made a mold using regular foam board (couldn’t find coroplast). Once the mold was ready, I whipped up my favorite slow tracing recipe and began to pour. NOTE TO SELF: if you make a mold and plan to use it at light trace, it’s a good idea to test for leaks first. Guess how I figured this one out?  So, the good news is that most of the soap stayed inside and that a slow leak creates some cool swirly patterns in the soap. Bad news: soap all over the counter. To make matters worse, my three year old got a hold of my phone and erased the video of the making of this soap. I have only the cutting portion to post. Bummer. Anyhow, here’s how these turned out:

_TSM6280  _TSM6277

And here is the cutting video:

I really liked the colors and the shimmy pattern from that batch. But, hey, it was only my first try. Surely I could improve upon it? One would think. Well, the second, third, fourth and fifth batches were all disasters for one reason or another. Some accelerated from my use of a new fragrance (Ahem, I believe we have discussed this already–apparently some people never learn.) Others became too thick for unknown reasons. I am including some photos and videos of the errant batches here to publicly document these astounding fails. Astounding because it’s hard to believe one person can make the same mistake so many times!! Don’t get me wrong–all the batches are usable soap, and they are each pretty in their own way. I guess I must be feeling a little resentful for the unrelenting way each batch thickened up so fast. Oh well, there’s always next month . . .

  • Untitled so far (fragranced with Little Black Dress FO from Rustic Essentuals):

_TSM6297 _TSM6302

  • Goat Milk and Wine Soap (this one thickened up so fast it was just plop and go.

_TSM6296 _TSM6291

  • Lavender and Lemongrass:

_TSM6317 _TSM6313

  • Pure Soap (using the ghost swirl technique from Auntie Clara)

_TSM6308 _TSM6305

For me, this challenge was especially challenging. It looks so simple, but I had a hard time getting it right. It was great practice and now I have a bunch of soap that will be ready in a few weeks!

Alternative Liquids Soap Challenge (and vertical mica line tutorial)

_TSM5915 _TSM5923

For a while now, I have been meaning to do a tutorial on how I make vertical mica lines, and this month’s soap challenge really lent itself to this technique.

It all started about a year ago. I had purchased a round mold, because I wanted to have more than one shape of soap. I did faux funnel pours, real funnel pours, in the pot swirls and then I was basically out of ideas for unique looking round soaps.

The challenge with a vertical mold is that it’s pretty hard to get an interesting (and uniform) technique that runs through all the bars. Unlike a loaf mold, where you have access to the whole top of the soap for creating texture or color effects, with a vertical mold, all the sides just look the same.

I had seen an inventive technique on Soaping 101 where she takes a flexible plastic cutting mat and sort of rolls it up inside the mold to create a yen/yang soap. That was genius, but there are only so many variations I could think of for that one. (How many versions of  Yen/Yang soap do I really need??)

Then I tried coating the insides of my mold with mica–similar to flouring a pan you’re about to bake a cake in. I just dumped in about 1/2 teaspoon of mica, put on both ends of the mold and shook away. That produced a really cool effect on the edges of the bars (so, one problem solved!), but I still felt pretty limited on my design choices for the inside of the bar.

After tossing this around in my brain for a week or two, I had the idea of combining the two ideas. I made a paste of olive oil and mica and kind of smeared it all over a flexible cutting mat, which I then rolled up and placed into my mold. It turned out really well. Since then, I have done quite a bit of experimenting with this idea. I have made vertical soap in milk cartons (produces square soap) with vertical mica lines, and I have tried various ways of folding the plastic mat inside to achieve different results. I even made a spiral divider using aluminum foil and plastic wrap.

In case anyone is interested in a tutorial, below the description of my soap for this month’s challenge, I will include links to a bunch of videos (some cool ones, some fails) showing various ways to apply this technique, as well as some photos.

  • Now for the Challenge

_TSM5919 _TSM5921

For this challenge, we had to use an alternative liquid (in lieu of water) and only natural colorants. I have been wanting to try carrot juice in soap for ages. Ever since seeing the “Say Yes to Carrots” line in stores, I have been intrigued by the beta carotene and other goodies they contain, and the possible skin care benefits.

I also had some fresh goat milk in the fridge from a lotion-making project, and decided to use half goat milk and half carrot juice. I decided to use both liquids together mainly because of the amazingly orange colored juice the carrots produced. I love vibrant colors, but having my whole base neon orange would not be conducive to a color palette that appealed to me. So, I used half goat milk in an attempt to minimize the orange color and give me room to let the other natural colorants shine.

I discovered in my research that carrots are pretty amazing. The substance that makes carrots orange is beta-carotene. According to this site, “Beta-carotene is converted by the body into vitamin A, which is used to repair the skin, eyes, and immune system.” And on this site I discovered that “Carrot soap provides many health benefits. It is abundantly rich in beta carotene, a powerful antioxidant that enhances cell renewal or cell turnover, helps to clear and clean sweat glands and reduce acne, safeguards the skin against sunburn and damage, and evens out mottled skin tones. This soap is also a strong moisturizer, augmenting the skin’s capacity to hold moisture, which helps prevent dry skin and psoriasis.” Armed with this information, I forged ahead to gather more knowledge on my other liquid, goat milk.

Goat milk has long been accepted as a beneficial ingredient for skin. It contains lactic acid, a mild exfoliant, as well as several vitamins. I did a quick search and found this site, which expounds a bit more on the qualities of goat milk in soap.

Convinced that these two powerhouse ingredients would make an excellent addition to a facial bar, I planned the rest of my ingredients. I decided to add an essential oil blend containing cedar, lavender, and spearmint, each of which will enhance the skin benefits of this soap. For colorants, I used indigo powder, rose clay, kaolin clay, and sea clay. The clays are also known for their skin nourishing benefits.

To make the soap: First, I juiced a couple of pounds of organic carrots. Then I froze the carrot juice and goat milk in ice cube trays. The next day I carefully poured my lye a little at a time into the carrot/milk cubes. I added this mixture to my oils and blended to thin trace, adding a bit of kaolin clay and an essential oil blend to the entire batch.

Next came the fun part! I separated it out into three containers. To one (about 1/4 of the batter) I added indigo powder and rose clay, to the second, (about 1/4) I added sea clay. To the rest (about 1/2) I added acai berry powder. I poured it into the prepared mold, with my vertical mica liner in place. (The liner was coated with indigo powder and clay, since mica is not allowed on this challenge.) Then, I basically did a faux funnel pour with the light color and one of the dark colors in each side of the mold. To get a better idea of how this worked, please take a look at the video:

And here is a random gallery of vertical mica line soaps:

And the extra videos I mentioned:

As usual, this challenge has been fun, exciting, and, well, challenging. 🙂 Thanks, Amy!

Trying out the Clyde Slide (September Soap Challenge Club)

This month’s Soap Challenge Club technique was the Clyde Slide. Well, I had to participate in this one because it has such a cool rhymey name. 🙂 I have been a little busier than usual with the new school year and sports and music and home school and . . . well, my normal hectic life. So, as a result, I only did two soaps in this technique: Berries and Bird of Paradise.

I was looking over my recent soap pics and I think I may be in danger of being in a color rut!! Oh no! Basically, my soaps tend to be blue/purple or pink/orange. HMMM. Well, okay, those are my favorite color combos, but maybe I need to branch out. After all this deep color thinking, I have decided to (gasp) add green into one of the soaps this month. (I KNOW!!) So, yes, green is a bit out of my comfort zone for soaping, but I paired it with purple and pink, which are very much IN my comfort zone, so it’s not too scary. 🙂 Here’s how the experimenting went:

  • Berries

_TSM5184 _TSM5191

I have been experimenting lately with using a fragrance that accelerates as a design element. For this soap, I used Grapefruit Bellini in the purple layer at the bottom. I added the fragrance, poured it, and then waited a few minutes for it to set up. Then I used a knife to make a design in it. I was going for a wave, because I thought it would look cool with a Clyde Slide on top of it. Since I used my regular slow-moving recipe, the rest of the batter was nice and thin for the swirl layer. I used Black Raspberry Vanilla and Sweet Orange Chili Pepper to scent that part. The result is a very berry-ish scent, with just a bit of  grapefruit to cut through the sweetness. I like it! My favorite part of this loaf is the bars that have a guitar-looking swirl. SOOO Cool! Here’s the video:

  • Bird of Paradise

_TSM5206 _TSM5201

And here, folks, is the soap we’ve all been waiting for. It has GREEN. Not a lot, of course. Baby steps. For this soap, I used my regular slow moving recipe and Acai Berry scent. I thought the batter was a little too thin for the Berries Soap, so I used the no heat added method of mixing the soap (add hot lye water to solid oils to melt them instead of pre-melting). This results in a slightly thicker batter (for my recipe, which contains lard). I think this was effective, since the feathered markings are more distinct on this batch.

I chose the name after cutting. Somehow it just reminds me of those lovely flowers. I love the graceful, free flowing feel of this technique. A big thanks to Clyde of Vibrant Soaps for sharing his technique and to Amy Warden of Great Cakes Soapworks for choosing it as the theme this month! Here’s the video:

And here are a few more photos of these two soap batches:

_TSM5196 _TSM5194 _TSM5189 _TSM5179 _TSM5177 _TSM5175 _TSM5172 _TSM5202

Making Figgy Pudding Soap – Using Fragrance to Accelerate (Yes, on purpose) :)

_TSM5113

So, I had this amazing smelling Moroccan Fig fragrance oil from Brambleberry, and I knew from their (super helpful and informative) website that this one would accelerate. I pictured myself rushing to get a gloppy mess into a mold, and then cleaning up, and then not really loving the resulting soap . . . and so I put the whole thing off for a while.

Then, because I really wanted to soap with this scent, I started brainstorming ideas and scenarios where acceleration was not the enemy. I saw a beautiful soap on Soapjam that had the bottom layer kind of curvy instead of straight across. So then I started thinking about doing a layered soap and using the thick soap that smelled like figs as the bottom layer. Then I could spoon my bottom layer around and create peaks and valleys. I would use my slow tracing soap recipe so that I would have more freedom with the design of the other layers.

I made dark brown (for the bottom layer), light brown, tan, and white for this soap. I scented the top layers with an oatmeal, milk and honey scent, which, when mixed with the moroccan fig scent, reminds me of what I imagine figgy pudding to taste like. (I have never seen or tasted actual figgy pudding, but have always wondered what it is like, since hearing “We Wish you a Merry Christmas” as a child.) 🙂

Anyhow, then I did a simple in-the-pot swirl with the remaining colors, reserving some white batter for the very top. I just did a quick swipe with fork tines to texture the top. You can see it come together in the video below. For anyone else who tries this technique of using acceleration as a design element, I’d love to see your soap pics!

_TSM5114

_TSM5108

Mantra Marbles Soap Challenge

  • Columbine Honey

This month’s challenge club technique was Mantra Marbles! It is a beautiful effect, and I was very excited to try it. In the tutorial video, Amy recommends using a slow moving soap recipe to best achieve the swirls. Unfortunately, I did not have enough confidence in my ability to improvise leak proof dividers for my slab mold, so I went with a medium tracing recipe, hoping the different colors would stay put. Then, it kind of turned into a fast tracing recipe once I added the scent. Ugh! The video is a bit comical as I try to do an intricate pattern with soap the consistency of mashed potatoes. 🙂 I used micas for colorant and did a gold mica swirl in the top. Here’s how it turned out:

_TSM3009

_TSM3005

And here is the video of me making it:

  • Grace

So, I kind of like how that one turned out, but it is not what I was hoping to enter for this contest, so I tried again. This time I used a new fragrance that smells a bit like Philosophy’s Amazing Grace. I called it “Grace”. I really like blues/purples/and teals, so I went with micas in those hues. Then, I mixed some glitter with a bit of olive oil to make something like a mica swirl on the top, but with glitter. I really like how much the glitter shows up in the final product.

I used my favorite slow tracing recipe, but was foiled again by the fragrance, which caused accelleration! I KNOW better than to try out a new scent when I need the batter to stay thin. Oh well. I used a spoon handle for the swirling to really pull the colors through. Here’s the cut soap:

_TSM3091 _TSM3098

And here’s the video:

  • Refresh Detox III

Next, I needed to make some more of my Refresh Detox soap, because I was all out. I decided to use different clays as the colorants and essential oils for the scent, so it would be a completely natural soap. I used bentonite, kaolin, rose, sea, and rhassoul clays. I also added some honey for luxurious bubbles. The batter behaved perfectly, and I love the clear mantra pattern that showed up in the final product:

_TSM3106_TSM3109


And here is the video:

  • Ruby Red

Well, I couldn’t stop experimenting with this technique, so I went ahead and made one more batch. This time I used a fragrance blend I like to call “Ruby Red.” It needed bright happy colors, so I went with pinks, oranges, and reds. I was planning to do another mica/glitter line in this batch, but somehow I forgot. Once again, the batter behaved perfectly and I was able to do the combing technique on the multi colored portion. This one turned out to be my favorite both because of the scent and because of the colors. Here it is cut:

_TSM3124_TSM3114_TSM3117 _TSM3120

And here is the video:

This was an awesome challenge! I sure do love trying out new techniques. Thank you, Amy Warden, for hosting the challenge! I can’t wait to see all the entries.


My Ebru Soap Challenge Journey

IMG_4683_TSM1573sq_TSM1400-2_TSM1543

These are the four soaps I made for this months Great Cakes Soapworks Soap Challenge. Looking at the photos, I find it really difficult to choose a favorite. It’s almost like choosing a favorite child (impossible) 🙂

Anyway, to get started, I watched Amy Warden’s tutorial. The challenge was to make a Turkish Ebru Marbling inspired soap. Then I spent literally hours looking at images of ebru art. It is amazing what can be done with paint and water. Soap, even very slow moving recipes, is still more viscous than water, which inhibits the free movement and spreading out of the colors. That is a very important design consideration for soap.

  • Lav/Pep/Pat

I decided to start out with what is probably my all time favorite essential oil combination: lavender/peppermint/patchouli. I used my favorite slow moving cold process soap recipe, and this photo as the inspiration:

To see this amazing Ebru artist's work, please visit: http://molempire.com/2011/08/01/painting-on-water-the-art-of-ebru/
To see this amazing Ebru artist’s work, please visit: http://molempire.com/2011/08/01/painting-on-water-the-art-of-ebru/

I decided to use blues and greens, with black and white for accents. Yes, that is pretty much my go-to color palette. 🙂 Here are some photos of how it turned out:

_TSM1376 _TSM1381  _TSM1382IMG_4683

And here is the video showing me making it:

  • Fusion Ebru

Next, I wanted to try a different technique. I saw this amazing waterfall design online:

Visit this page at: https://www.pinterest.com/pin/113153009364516718/

I thought that I might be able to get soap to look something like this. Again, I used my favorite recipe, and this time a beautiful summery color palette of oranges and pinks. I used a bright, citrusy scent that is very well behaved, and I also added some red jojoba beads to spice things up. Here is how that one turned out:

_TSM1404 _TSM1406    _TSM1396 _TSM1393

And here is the video of me making it:

  • Mint and Cedar

I still wasn’t satisfied. Yes, those soaps had turned out beautifully, but I wanted to push myself even more and try to make something . . . I don’t know . . . more turkish-y?? Anyway, with that in mind, I found a couple more inspiration photos:

To view this image on its original page, please visit: http://www.arkofcrafts.com/en/tulip-marbling-art-on-paper
To view more of this artist's work, please visit: https://www.etsy.com/shop/StudioRobertWu?ref=s2-header-shopname
To view more of this artist’s work, please visit: https://www.etsy.com/shop/StudioRobertWu?ref=s2-header-shopname

I see a lot of tan/beige swirly backgrounds like the tulip image above in ebru art. I wanted to combine that look with the feel of the second image. I love the dreamy, wavelike feel of that one. I also like its simplicity. So, for this batch, I used Amy’s recommended slow-moving recipe, and a blend of lavender, cedar, and spearmint essential oils. Here’s how it turned out:

_TSM1577 _TSM1578 _TSM1574 _TSM1568

And here’s the video of me making it:

While I do like how this one turned out, I don’t think I captured the simplicity I was going for. I think the problem is that I made too much of each color, and was reluctant to waste it, so I just went ahead and piled it all on.

  • Minty Fresh

Determined to get it right, I decided to try one more batch, this time using much less of the accent colors. So, I decided to use my favorite recipe again, and this time I did another EO combo, this time mostly spearmint, with a hint of cedar and lavender. (I must be on a mint kick.)

Here’s how this one turned out:

_TSM1652 _TSM1650 _TSM1643 _TSM1631

And here’s the video of me making the soap:

So . . . how to choose. I love the last one. It looks very “ebru-ish” to me. But, I’m torn, because I also LOVE the blues/greens/black of the very first one. And then that bright orange and pink one just makes me happy. ARGH. I can’t decide. My husband and my mom both like the first one the best. My kids like various different ones the best. Hmmmmm. I guess I will decide when I join the link up. 🙂

One last pic, because I had to show off my new soaping goggles. :)
One last pic, because I had to show off my new soaping goggles. 🙂

Making Earl Gray Soap

Earl Gray Soap

Earl Gray is my favorite tea. I drink it every morning. I used to love coffee, but after the birth of baby #4, I just lost my taste for it. I was in denial for a year or two, and like a lemming, kept trying coffee every few months, but, alas, I just don’t like the stuff any more. So, then I tried a few other morning beverages. When I found Earl Gray, I was home 🙂

So, anyhow, I wanted to make a soap that was Earl Gray (ish). I found a scent with that name and bought a small bottle online. It doesn’t really smell very much like the tea. It is, however, a very pleasant smell, and I added some orange and black pepper essential oils to get the scent a little closer to the tea.

Choosing colors was challenging. I typically don’t like orange and brown together, but I wanted to put actual ground up tea leaves in the soap, which would definitely be brown, and then I wanted to highlight the orange/bergamot scent with an orange swirl. Finally I decided to add some white to break up the colors a bit. I did a hanger swirl with the white and orange in the brown base. I really like the brownish/gray color the tea leaves turned, and the color palette worked out!

The final result is a nice, hard bar that is scrubby from the tea leaves and smells great. Here’s the video showing how I made it:

Making Herbal Sore Throat Tea

Herbs before mixing
Herbs before mixing

My sweet little one is not feeling her best today! (She might object to being called a little one – she’s 11 🙂 ). Our family has been struggling with a cold/cough/congestion thing for a few days. We have been taking our silver, eating real food, and trying to get plenty of rest~and I think it has been helping, but now it’s time to attack this bug in another way. I decided to whip up a batch of tea, with herbs that help with health in general and also specifically this cold thing we’re dealing with.

I have made sore throat tea many times before, and I usually vary the ingredients, depending on what I have on hand. One time I used horehound. UGH! Never again. It is so bitter. No one could stand to drink it. I usually use a lot of peppermint, because it tastes good and helps to camouflage the not so delicious ingredients.

Here’s what’s in this batch:

Organic Peppermint Leaves – 3/4 cup

1 tablespoon each of the following:

  • organic yarrow – fights bacteria, expectorant, decongestant Reference.
  • organic mullein – used for congestion, and to sooth sore throats Reference.
  • slippery elm bark powder – used to sooth sore throats Reference.
  • chamomile – calming, immune booster Reference.
  • organic st john’s wort – used for sore throats, sinus infections Reference.
  • organic catnip – used for cough and congestion Reference.
  • organic rose hips – lots of vitamin C, used to treat colds and flu Reference.
  • organic elder flowers – used for colds and respiratory issues, among other things Reference.

To make the tea, I bring about a quart of water to boil, turn off heat, and add 2 heaping tablespoons of the herb mixture. Then I let it steep for about 20 minutes and strain into cups. To serve, I add local raw honey to taste.

Straining the tea
Straining the tea

As you can see, I use organic herbs whenever possible. I think it’s especially important to avoid pesticides in uses where the food is soaked or steeped in water, which allows the chemical compounds in the food to be released.

I will offer this tea to all the sickies in my house about every hour or so. Some of these herbs are not recommended for continual use, so we will use this treatment only for a few days. Hopefully these powerhouse herbs will help somewhat with the illness, but even if their effects are not overwhelming, just having a soothing delicious beverage every hour will help with the morale. 🙂

This information is solely for informational purposes. IT IS NOT INTENDED TO PROVIDE MEDICAL ADVICE.  Always consult your physician before making any changes to your diet.