Dancing Funnel Technique

_TSM7695Whew! It’s been forever since I posted a blog entry! It’s about time. This month’s Great Cakes Soapworks Challenge Club technique was the Dancing Funnel by guest teacher Tatsiana Serko. I LOVE her soap! This lady rocks. She and Amy co-taught the tutorial and it was very informative. There are two category options this month, all natural and synthetic. I opted for the all-natural. I made two soap batches:

Indigo Dancing Funnel Soap

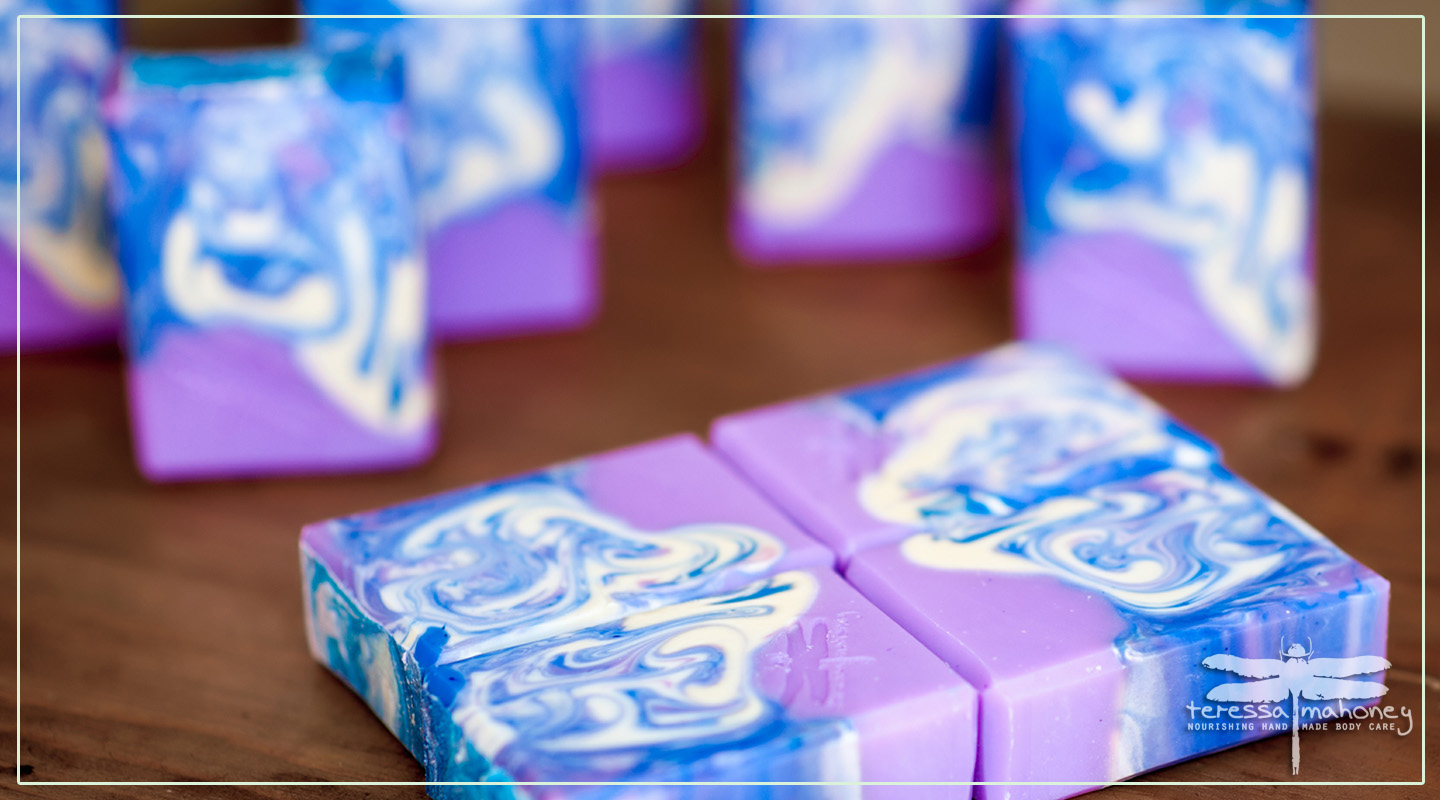
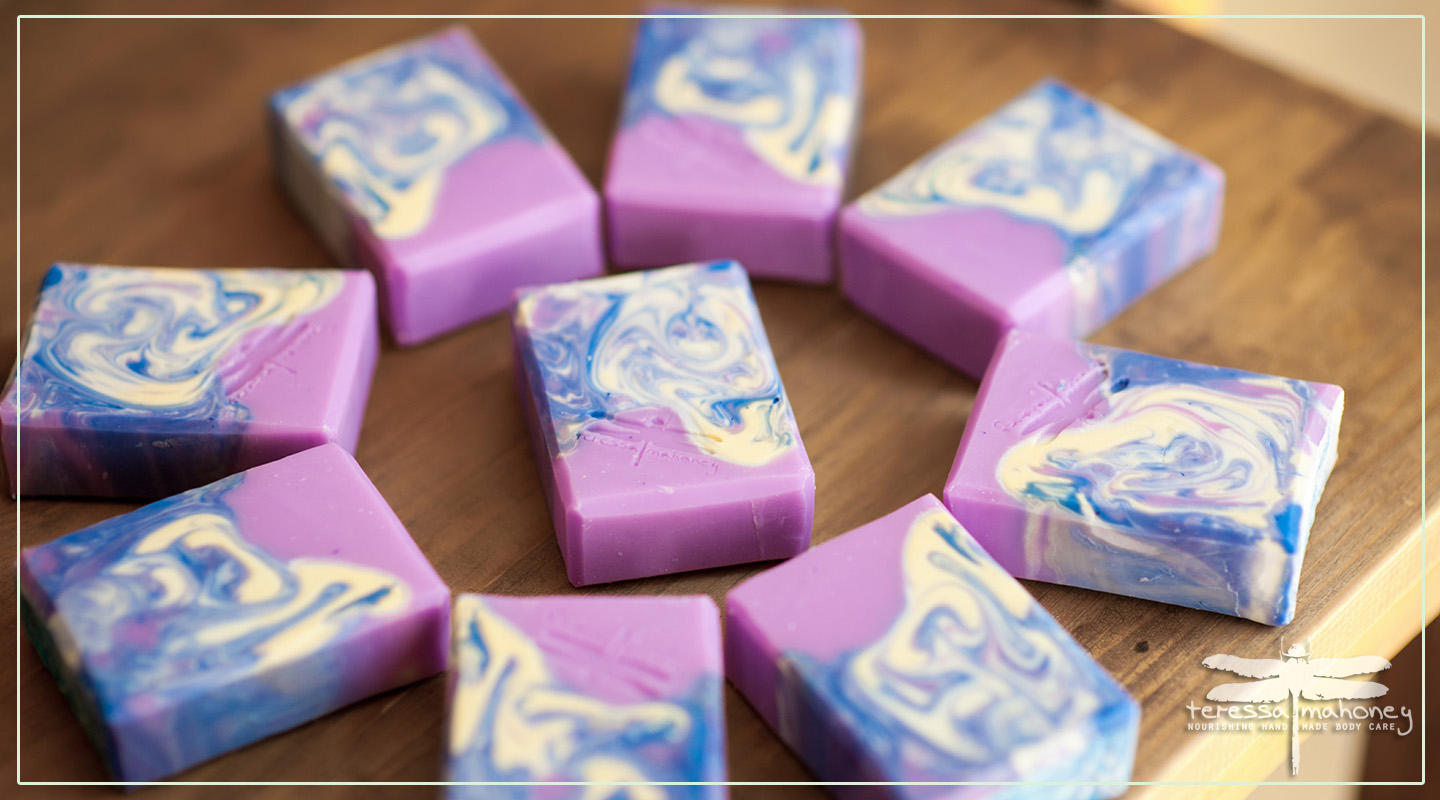
I was brainstorming ways to make my soap different and eye-catching while still staying in the guidelines, and thought maybe I could do an ombré effect on the inside colors. I was picturing water and how the light hits it, causing slight variations in the blue. I thought I could add some additional texture to the blue by adding finely ground oats. Luckily for me, indigo powder creates a lovely blue and is all natural! It can also bleed a bit, which would be great for a gradient look. Unluckily for me, in the contest, there are no variations in color allowed for the inside color. Well, I went ahead and made this batch before I understood that rule, so, while it is not permissible as a contest entry, it was a great practice batch. Here’s how it turned out:

And here is the “making of” video:

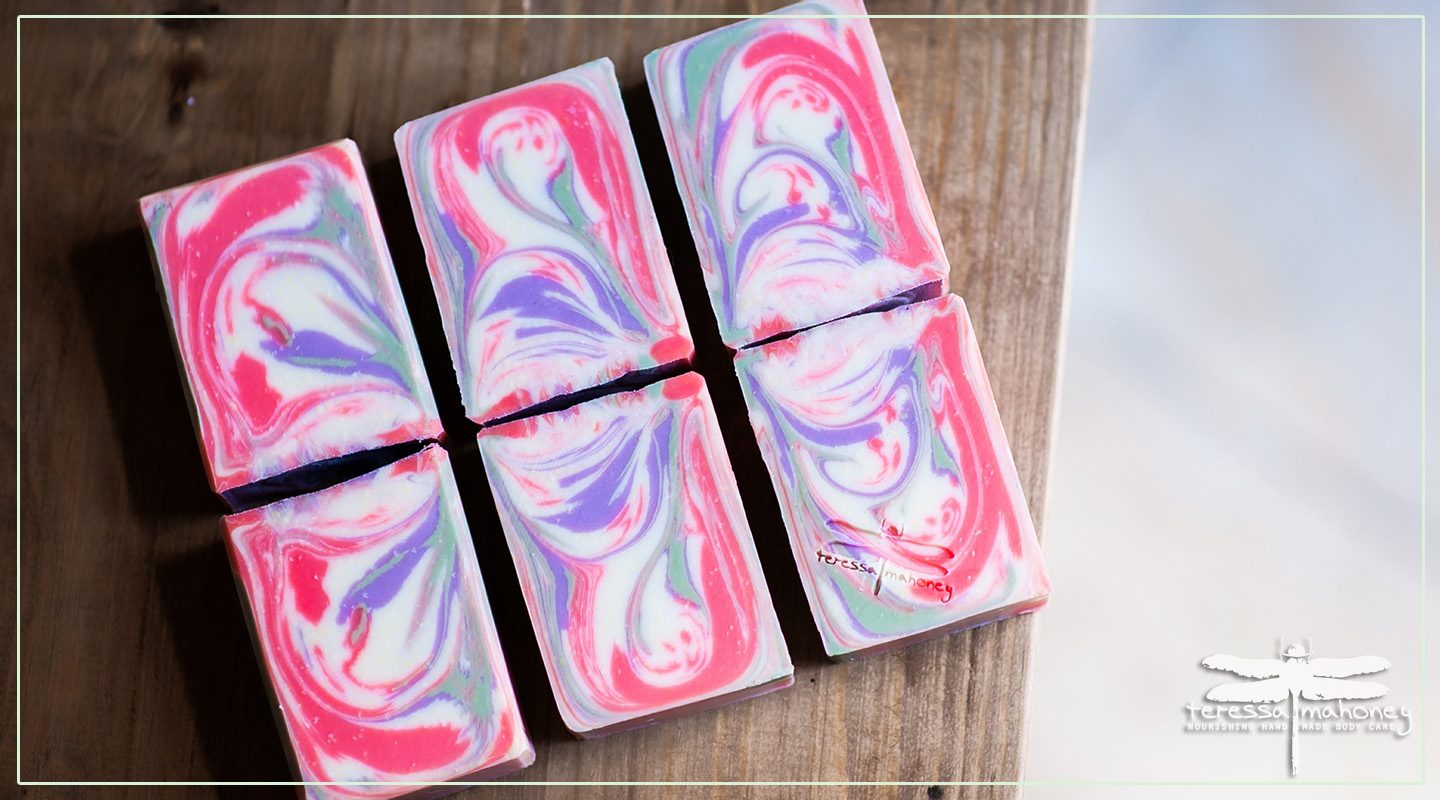
Juniper & Cedar Wood Dancing Swirl Soap

I liked the look of that soap, especially the variations in the inside color, but I really needed to make a soap that followed the rules. So, I got out all my natural colorants to see if any ideas came to mind. I finally settled on these colorants:

  1. Activated charcoal mixed with a smidge of red clay and some ground acai berry for the background color
  2. Rhassoul clay for a creamy color
  3. Sea clay for a greenish color
  4. Purple Brazilian clay for (you guessed it) purple
  5. Red Brazilian clay for (surprise) red

I also wanted to add some cranberry seeds to the soap for two reasons. 1) I keep getting requests for exfoliating soap, and 2) cranberry seeds turn black and look really cool in soap.

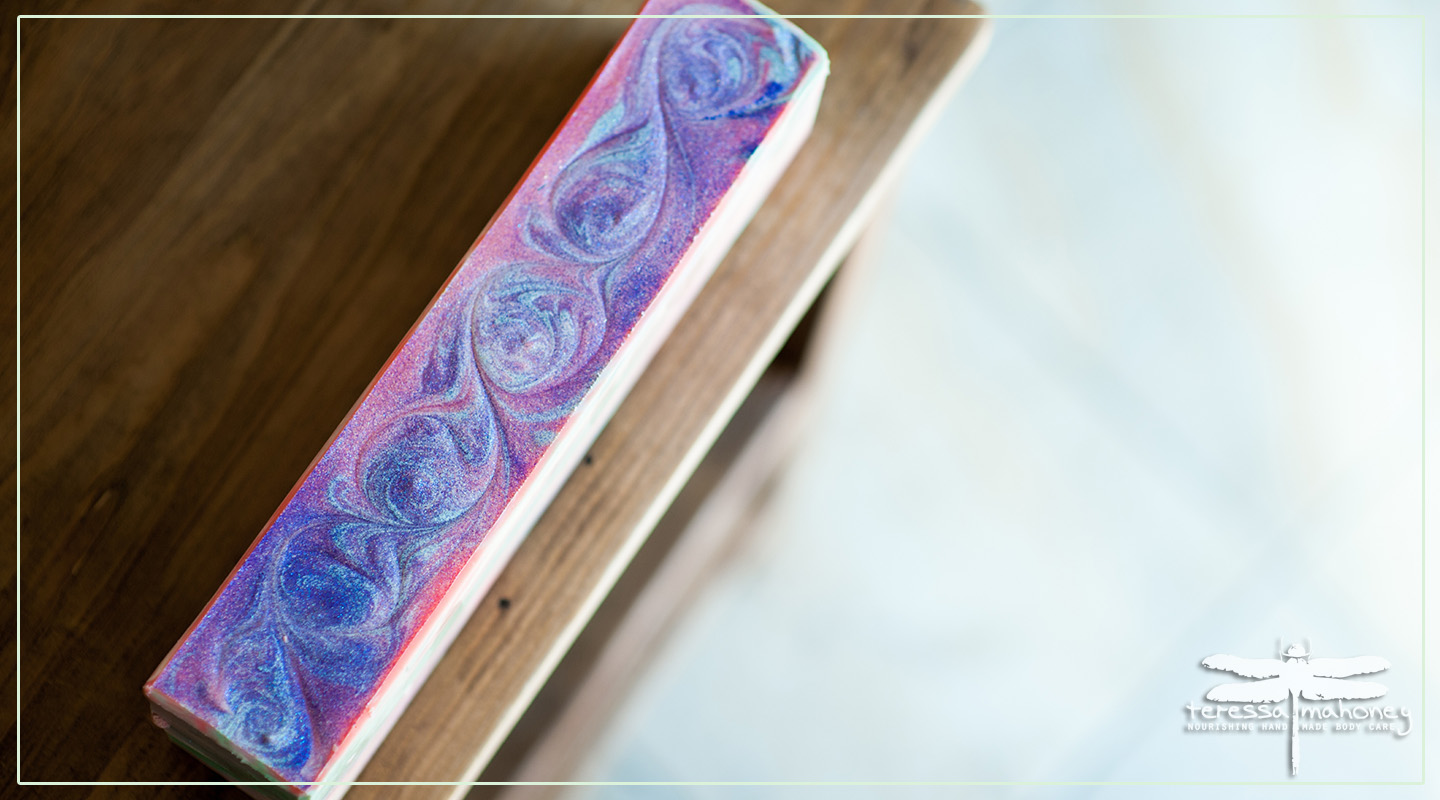
This one was a lot of fun to make. I was already comfortable with the technique, thanks to my practice batch, and the only thing that was new was deciding where to put the colors. I finally decided on a random approach. I made around 20 dark dots, then filled in 5 each for the four other colors. Sometimes I had fewer than 20 dots, and I had to rotate in the colors to even things out.

You’ll notice in the video that a lot of the cranberry seeds floated to the top of my soap. I guess the soap was too liquid to hold them in place. Some of them stayed put, though, resulting in some interesting black dots in the soap. There was also some oil left on the top of the soap after 24 hours, so I planed off the top layer. Here’s the video:

And a few pics:


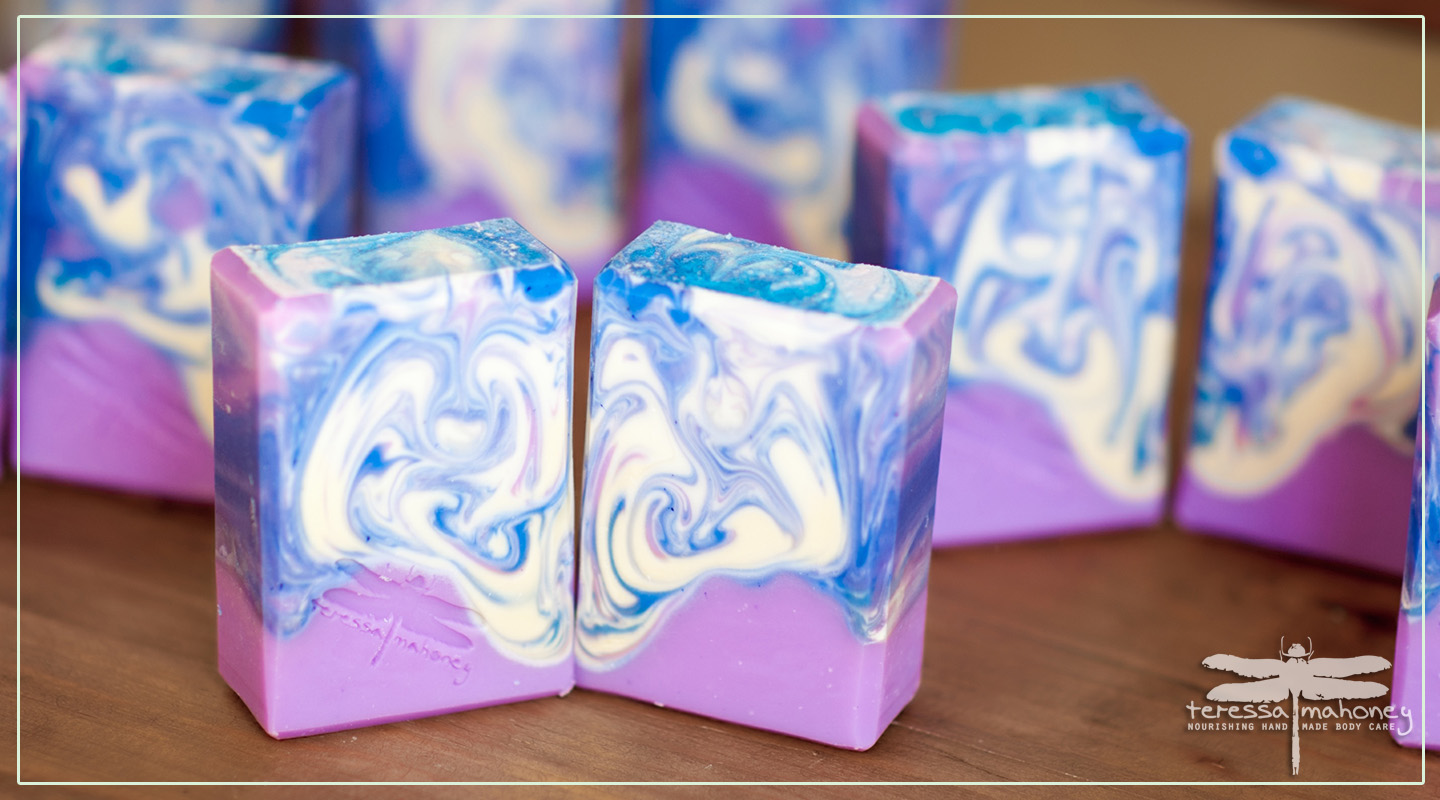
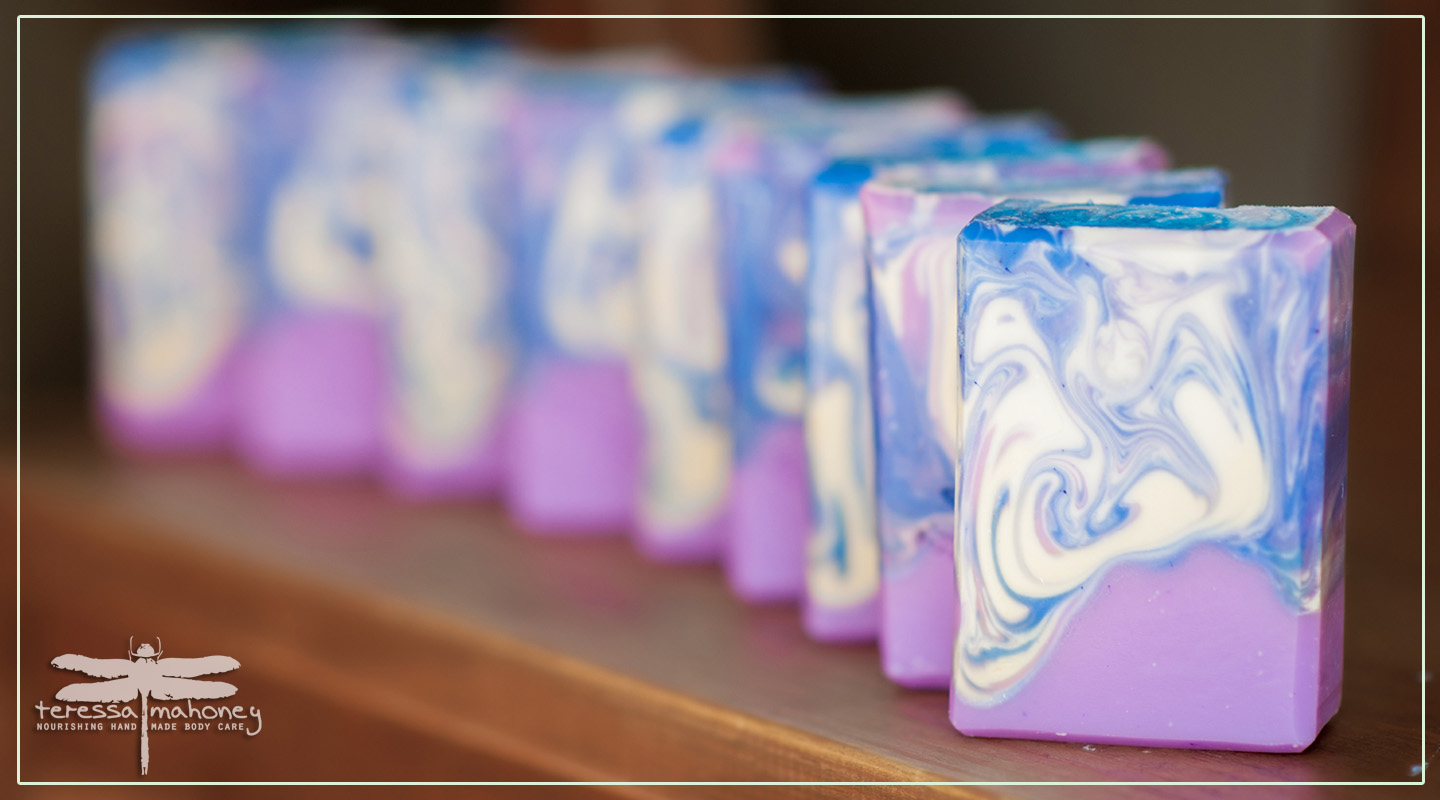
This technique is so cool! I love the way it turns out and it is not very difficult compared to some of the Soap Challenge Club techniques I’ve tried. I especially like how the sides of the bars look. I will be using this one again and again. My husband says it reminds him of cucumbers. (Of course, now I’m planning a cucumber batch, with a gradient of light to medium green for the inside color. I’m still working out how to get the look of the seeds . . . ) Thanks Amy and Tatsiana!

Complete ingredient list for Juniper and Cedar soap:

lard, water, olive oil, coconut oil, lye, activated charcoal, red Brazilian clay, purple Brazilian clay, sea clay, rhassoul clay, acai berry powder, cranberry seeds, essential oil blend (juniper berry essential oil, cedar wood essential oil, patchouli essential oil)

Trying out the Clyde Slide (September Soap Challenge Club)

This month’s Soap Challenge Club technique was the Clyde Slide. Well, I had to participate in this one because it has such a cool rhymey name. 🙂 I have been a little busier than usual with the new school year and sports and music and home school and . . . well, my normal hectic life. So, as a result, I only did two soaps in this technique: Berries and Bird of Paradise.

I was looking over my recent soap pics and I think I may be in danger of being in a color rut!! Oh no! Basically, my soaps tend to be blue/purple or pink/orange. HMMM. Well, okay, those are my favorite color combos, but maybe I need to branch out. After all this deep color thinking, I have decided to (gasp) add green into one of the soaps this month. (I KNOW!!) So, yes, green is a bit out of my comfort zone for soaping, but I paired it with purple and pink, which are very much IN my comfort zone, so it’s not too scary. 🙂 Here’s how the experimenting went:

  • Berries

_TSM5184 _TSM5191

I have been experimenting lately with using a fragrance that accelerates as a design element. For this soap, I used Grapefruit Bellini in the purple layer at the bottom. I added the fragrance, poured it, and then waited a few minutes for it to set up. Then I used a knife to make a design in it. I was going for a wave, because I thought it would look cool with a Clyde Slide on top of it. Since I used my regular slow-moving recipe, the rest of the batter was nice and thin for the swirl layer. I used Black Raspberry Vanilla and Sweet Orange Chili Pepper to scent that part. The result is a very berry-ish scent, with just a bit of  grapefruit to cut through the sweetness. I like it! My favorite part of this loaf is the bars that have a guitar-looking swirl. SOOO Cool! Here’s the video:

  • Bird of Paradise

_TSM5206 _TSM5201

And here, folks, is the soap we’ve all been waiting for. It has GREEN. Not a lot, of course. Baby steps. For this soap, I used my regular slow moving recipe and Acai Berry scent. I thought the batter was a little too thin for the Berries Soap, so I used the no heat added method of mixing the soap (add hot lye water to solid oils to melt them instead of pre-melting). This results in a slightly thicker batter (for my recipe, which contains lard). I think this was effective, since the feathered markings are more distinct on this batch.

I chose the name after cutting. Somehow it just reminds me of those lovely flowers. I love the graceful, free flowing feel of this technique. A big thanks to Clyde of Vibrant Soaps for sharing his technique and to Amy Warden of Great Cakes Soapworks for choosing it as the theme this month! Here’s the video:

And here are a few more photos of these two soap batches:

_TSM5196 _TSM5194 _TSM5189 _TSM5179 _TSM5177 _TSM5175 _TSM5172 _TSM5202

My Ebru Soap Challenge Journey

IMG_4683_TSM1573sq_TSM1400-2_TSM1543

These are the four soaps I made for this months Great Cakes Soapworks Soap Challenge. Looking at the photos, I find it really difficult to choose a favorite. It’s almost like choosing a favorite child (impossible) 🙂

Anyway, to get started, I watched Amy Warden’s tutorial. The challenge was to make a Turkish Ebru Marbling inspired soap. Then I spent literally hours looking at images of ebru art. It is amazing what can be done with paint and water. Soap, even very slow moving recipes, is still more viscous than water, which inhibits the free movement and spreading out of the colors. That is a very important design consideration for soap.

  • Lav/Pep/Pat

I decided to start out with what is probably my all time favorite essential oil combination: lavender/peppermint/patchouli. I used my favorite slow moving cold process soap recipe, and this photo as the inspiration:

To see this amazing Ebru artist's work, please visit: http://molempire.com/2011/08/01/painting-on-water-the-art-of-ebru/
To see this amazing Ebru artist’s work, please visit: http://molempire.com/2011/08/01/painting-on-water-the-art-of-ebru/

I decided to use blues and greens, with black and white for accents. Yes, that is pretty much my go-to color palette. 🙂 Here are some photos of how it turned out:

_TSM1376 _TSM1381  _TSM1382IMG_4683

And here is the video showing me making it:

  • Fusion Ebru

Next, I wanted to try a different technique. I saw this amazing waterfall design online:

Visit this page at: https://www.pinterest.com/pin/113153009364516718/

I thought that I might be able to get soap to look something like this. Again, I used my favorite recipe, and this time a beautiful summery color palette of oranges and pinks. I used a bright, citrusy scent that is very well behaved, and I also added some red jojoba beads to spice things up. Here is how that one turned out:

_TSM1404 _TSM1406    _TSM1396 _TSM1393

And here is the video of me making it:

  • Mint and Cedar

I still wasn’t satisfied. Yes, those soaps had turned out beautifully, but I wanted to push myself even more and try to make something . . . I don’t know . . . more turkish-y?? Anyway, with that in mind, I found a couple more inspiration photos:

To view this image on its original page, please visit: http://www.arkofcrafts.com/en/tulip-marbling-art-on-paper
To view more of this artist's work, please visit: https://www.etsy.com/shop/StudioRobertWu?ref=s2-header-shopname
To view more of this artist’s work, please visit: https://www.etsy.com/shop/StudioRobertWu?ref=s2-header-shopname

I see a lot of tan/beige swirly backgrounds like the tulip image above in ebru art. I wanted to combine that look with the feel of the second image. I love the dreamy, wavelike feel of that one. I also like its simplicity. So, for this batch, I used Amy’s recommended slow-moving recipe, and a blend of lavender, cedar, and spearmint essential oils. Here’s how it turned out:

_TSM1577 _TSM1578 _TSM1574 _TSM1568

And here’s the video of me making it:

While I do like how this one turned out, I don’t think I captured the simplicity I was going for. I think the problem is that I made too much of each color, and was reluctant to waste it, so I just went ahead and piled it all on.

  • Minty Fresh

Determined to get it right, I decided to try one more batch, this time using much less of the accent colors. So, I decided to use my favorite recipe again, and this time I did another EO combo, this time mostly spearmint, with a hint of cedar and lavender. (I must be on a mint kick.)

Here’s how this one turned out:

_TSM1652 _TSM1650 _TSM1643 _TSM1631

And here’s the video of me making the soap:

So . . . how to choose. I love the last one. It looks very “ebru-ish” to me. But, I’m torn, because I also LOVE the blues/greens/black of the very first one. And then that bright orange and pink one just makes me happy. ARGH. I can’t decide. My husband and my mom both like the first one the best. My kids like various different ones the best. Hmmmmm. I guess I will decide when I join the link up. 🙂

One last pic, because I had to show off my new soaping goggles. :)
One last pic, because I had to show off my new soaping goggles. 🙂

Making Earl Gray Soap

Earl Gray Soap

Earl Gray is my favorite tea. I drink it every morning. I used to love coffee, but after the birth of baby #4, I just lost my taste for it. I was in denial for a year or two, and like a lemming, kept trying coffee every few months, but, alas, I just don’t like the stuff any more. So, then I tried a few other morning beverages. When I found Earl Gray, I was home 🙂

So, anyhow, I wanted to make a soap that was Earl Gray (ish). I found a scent with that name and bought a small bottle online. It doesn’t really smell very much like the tea. It is, however, a very pleasant smell, and I added some orange and black pepper essential oils to get the scent a little closer to the tea.

Choosing colors was challenging. I typically don’t like orange and brown together, but I wanted to put actual ground up tea leaves in the soap, which would definitely be brown, and then I wanted to highlight the orange/bergamot scent with an orange swirl. Finally I decided to add some white to break up the colors a bit. I did a hanger swirl with the white and orange in the brown base. I really like the brownish/gray color the tea leaves turned, and the color palette worked out!

The final result is a nice, hard bar that is scrubby from the tea leaves and smells great. Here’s the video showing how I made it: